- What is a cluster
- How to obtain an account
- How to reset a password
- How to access the Xanadu cluster
- HPC resources and limits
- Working with Slurm (Running interactive jobs and submission scripts)
- Resource Limitations
- Different ways of Running Jobs
- How to submit, Monitor and Cancel a Job
- Need a GPU compute node (Please refer Resource Limitations).
- How to load software
- File system
- How to Transfer Data Between Clusters
What is a cluster
A desktop or a laptop, in most cases, is inadequate for analysis of large scale datasets (e.g. Genomics) or to run simulations (e.g. protein docking). They lack both the processing power and the memory to execute these analyses. This limitation can be overcome by combining machines (computers) in a predefined architecture/configuration so that they act as a single unit with enhanced computational power and shared resources. This is the basic concept of a high performance cluster. A cluster consists of a set connected computers that work together so that they can be viewed as a single system. Each computer unit in a cluster is referred as ‘node’.
The components of a cluster are usually connected through fast local area networks (“LAN”), with each node running its own instance of an operating system. The benefits of clusters include low cost, elasticity and the ability to run jobs anytime. anywhere.
Cluster Etiquette
- Never run anything on the head node of a cluster (where you first login).
- Keep track of what you are running and refrain from using all nodes at the same time.
- Run and write your output files in your home directory or designated locations.
- Be sure to clean up your temporary and intermediate files. Storage is limited.
How to obtain an account
To obtain an account in Xanadu, you must have a UCH account, also known as a CAM account. The following link will allow you to request this: http://bioinformatics.uconn.edu/contact-us/
Select: “Account Request (Xanadu cluster) ” from the list on the contact-us page.
Once you submit the request, you will receive a CAM form from a member of the UCH HPC team. You will fill out this second form, and upon approval, you will be able to access this cluster.
How to reset the password
An interface exists to reset your password here: (or past the following link in the browser window: https://vdusers.cam.uchc.edu/pm/)
Your CAM credentials will allow you to access this resource. You will likely be asked to reset your password every 6 months. If you find that you are unable to login to the terminal, your password may need a reset.
How to access Xanadu
Xanadu has two submit nodes (VM machines) on which a user can login and can access the cluster. The two submit nodes are xanadu-submit-ext and xanadu-submit-int. From a users perspective, both nodes are identical and one does not provide any extra advantage over the other. You will connect to submit nodes via a terminal (command line interface) via SSH protocol. If you are on a mac or linux machine, this is available on your operating system. Directions for Windows are below in this section and discuss Putty as an option.
xanadu-submit-ext
The hpc-submit-ext node can be accessed from anywhere and does not require a VPN connection.
ssh <user_name>@xanadu-submit-ext.cam.uchc.edu
xanadu-submit-int
In rare cases when xanadu-submit-ext is having issues, users can access xanadu-submit-int. However, to access it users must establish a VPN connection as the internal submit node is behind a firewall.
Note: For a limited time, for those who are already running jobs in the old cluster the external and internal submit nodes can be reached using old-xanadu-submit-ext and old-xanadu-submit-int hostnames.
Establishing VPN connection
To connect via the Virtual Private Network (VPN) client, you will need to download the free Pulse Secure application that is linked here:
Pulse Secure : Installation and Configuration
The details of installing and configuring pulse secure can be found here https://health.uconn.edu/high-performance-computing/tutorials/cam-vpn/.
Once a vpn connection is established, login to internal submit node
ssh user_name@xanadu-submit-int.cam.uchc.edu
Connecting to the Cluster using Windows Computer (Putty)
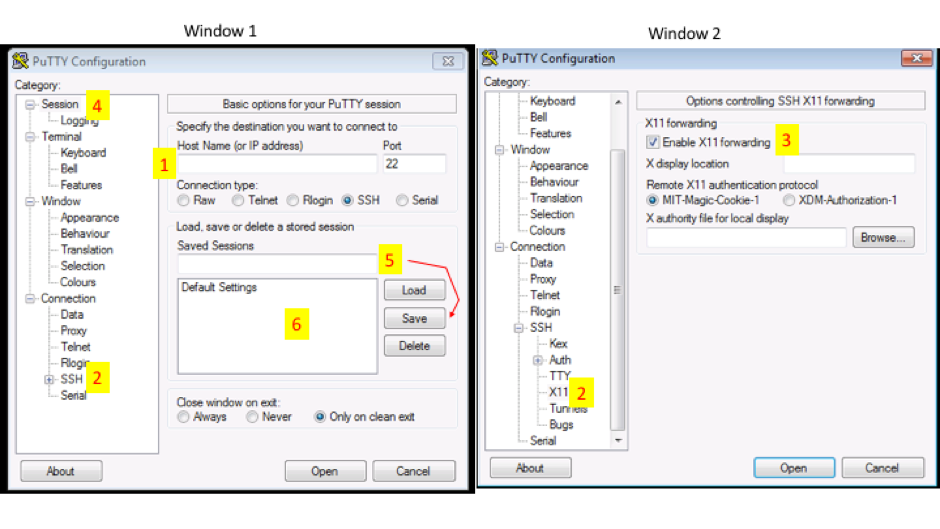
Windows users will need to use an SSH client to connect to the cluster.Install Putty and configure for use: Putty Configuration steps. Open Putty it will open Window1 (see below).
- Provide host name e.g. xanadu-submit-ext.cam.uchc.edu or xanadu-submit-int.cam.uchc.edu
- Expand SSH tab and select X11 (shown in window2) (optional)
- Enable X11 forwarding by selecting it. (window2) (optional)
- Scroll up the left panel and select Session.(window1)
- Name your session e.g. Xanadu_cluster and click save tab to save
- Your session name should appear in saved sessions
- Double click on your session name to connect to server with SSH session
HPC resources and limits
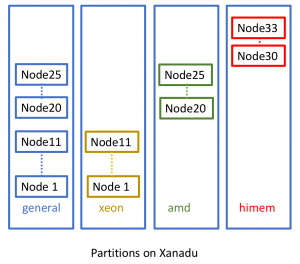
Xanadu cluster uses the Slurm, which is a highly scalable cluster management and job scheduling system for large and small Linux clusters. The nodes (individual nodes within the cluster) are divided into groups which are called partitions. Xanadu has several partitions available: general, xeon, amd and himem.
To look up the available partition information you can use ‘sinfo -s’ which will give you the current list:
$ sinfo -s
PARTITION AVAIL  TIMELIMIT   NODES(A/I/O/T)  NODELIST
general*     up   infinite        35/1/0/34  xanadu-[01-05,08,10-11,13-28,30-31,33-39,46,50]
xeon         up   infinite         10/0/0/10  xanadu-[01-05,08,10,39,46,50]
amd          up   infinite        25/0/0/25  xanadu-[11,13-28,30-31,33-38]
himem       up   infinite          5/1/0/6  xanadu-[06,40-44]
himem2       up   infinite          1/0/0/1  xanadu-07
mcbstudent    up   infinite          2/0/0/2  xanadu-[09,47]
pacbio        up   infinite          4/0/0/4  xanadu-[09,17-18,48]
gpu           up   infinite          1/0/0/1  xanadu-06
In the above the general* is the default partition for the users. Where NODES(A/I/O/T) are a count of a particular configuration by node state in the form of “Available / Idle / Other / Total “.
Xanadu cluster is mainly divided into few partitions:
general partition
himem partition
mcbstudent partition
pacbio partition
general partition: will consist of each nodes having 36 or 48 cpus in a given configuration, with 128/256 GB memory.
$ sinfo -N -l -p general


NODELIST   NODES PARTITION       STATE CPUS    S:C:T MEMORY TMP_DISK WEIGHT AVAIL_FE REASON

xanadu-01      1  general*       mixed   36   2:18:1 257845        0      1   (null) none

xanadu-03      1  general*       mixed   36   2:18:1 257845        0      1   (null) none

xanadu-04      1  general*       mixed   36   2:18:1 257845        0      1   (null) none

xanadu-05      1  general*    reserved   36   2:18:1 257845        0      1   (null) none

xanadu-10      1  general*   allocated   36   2:18:1 128693        0      1   (null) none

xanadu-11      1  general*       mixed   48    8:6:1 257949        0      1   (null) none

xanadu-12      1  general*       mixed   48    8:6:1 257949        0      1   (null) none

xanadu-13      1  general*   allocated   48    8:6:1 257949        0      1   (null) none

xanadu-14      1  general*   allocated   48    8:6:1 257949        0      1   (null) none

xanadu-15      1  general*       mixed   48    8:6:1 257949        0      1   (null) none

xanadu-16      1  general*       mixed   48    8:6:1 257949        0      1   (null) none

xanadu-17      1  general*       mixed   48    8:6:1 128925        0      1   (null) none

xanadu-18      1  general*       mixed   48    8:6:1 128925        0      1   (null) none

xanadu-19      1  general*       mixed   48    8:6:1 257949        0      1   (null) none

xanadu-20      1  general*       mixed   48    8:6:1 257949        0      1   (null) none

xanadu-21      1  general*       mixed   48    8:6:1 128925        0      1   (null) none

xanadu-22      1  general*   allocated   48    8:6:1 128925        0      1   (null) none

xanadu-23      1  general*   allocated   64    8:8:1 257933        0      1   (null) none

xanadu-24      1  general*       mixed   64    8:8:1 257933        0      1   (null) none

xanadu-25      1  general*   allocated   48    8:6:1 257949        0      1   (null) none

xanadu-26      1  general*       mixed   48    8:6:1 128925        0      1   (null) none

xanadu-27      1  general*       mixed   48    8:6:1 257949        0      1   (null) none

xanadu-28      1  general*       mixed   48    8:6:1 257949        0      1   (null) none

xanadu-29      1  general*       mixed   48    8:6:1 128922        0      1   (null) none

xanadu-30      1  general*       mixed   48    8:6:1 128922        0      1   (null) none

xanadu-31      1  general*       mixed   48    8:6:1 128922        0      1   (null) none

xanadu-33      1  general*   allocated   64    8:8:1 257933        0      1   (null) none

xanadu-34      1  general*   allocated   64    8:8:1 257933        0      1   (null) none

xanadu-35      1  general*   allocated   64    8:8:1 257933        0      1   (null) none

xanadu-36      1  general*       mixed   64    8:8:1 257933        0      1   (null) none

xanadu-39      1  general*   allocated   16    2:8:1 128825        0      1   (null) none

xanadu-46      1  general*       mixed   40   2:10:2 257914        0      1   (null) none

xanadu-47      1  general*       mixed   40   2:10:2 257914        0      1   (null) none

xanadu-50      1  general*       mixed   40   2:10:2 257914        0      1   (null) none
himem partiton: will have 5 nodes with each having 64 cores and 512 GB of memory
NODELIST   NODES PARTITION       STATE CPUS    S:C:T MEMORY TMP_DISK WEIGHT AVAIL_FE REASON
xanadu-30      1     himem       idle   64    4:8:1 515792    15620      1   (null) none
xanadu-31      1     himem       idle   64    4:8:1 515792    15620      1   (null) none
xanadu-32      1     himem       idle   64    4:8:1 515792    15620      1   (null) none
xanadu-33      1     himem       idle   64    4:8:1 515792    15620      1   (null) none
xanadu-29      1     himem      mixed   64    4:8:1 515792    15620      1   (null) none
himem2 partiton: Also now we have another high memory partition with 1TB memory which is called himem2:
NODELIST   NODES PARTITION       STATE CPUS    S:C:T MEMORY TMP_DISK WEIGHT AVAIL_FE REASON
xanadu-07      1    himem2       mixed   36   2:18:1 103198        0      1   (null) none
.
The general partition, can be further divided according to the processor type used in each node:
xeon partition (nodes consists of Xeon processors)
amd partition (nodes consists of AMD processors)
gpu partition (node consists of GPU processor: NVIDIA TESLA M10 )
xeon partition: will have 11 nodes with each having 36 cores and 156 GB
$ sinfo -N -l -p xeon

NODELIST   NODES PARTITION       STATE CPUS    S:C:T MEMORY TMP_DISK WEIGHT AVAIL_FE REASON
xanadu-01      1      xeon       mixed   36   2:18:1 257845        0      1   (null) none
xanadu-02      1      xeon       mixed   36   2:18:1 257845        0      1   (null) none
xanadu-03      1      xeon       mixed   36   2:18:1 257845        0      1   (null) none
xanadu-04      1      xeon      mixed@   36   2:18:1 257845        0      1   (null) none
xanadu-05      1      xeon    reserved   36   2:18:1 257845        0      1   (null) none
xanadu-06      1      xeon      mixed@   36   2:18:1 257845        0      1   (null) none
xanadu-07      1      xeon  allocated@   36   2:18:1 257845        0      1   (null) none
xanadu-08      1      xeon  allocated@   36   2:18:1 257845        0      1   (null) resize_tmp
xanadu-09      1      xeon   allocated   36   2:18:1 257845        0      1   (null) none
xanadu-10      1      xeon       mixed   36   2:18:1 128693        0      1   (null) none
xanadu-39      1      xeon       mixed   16    2:8:1 128825        0      1   (null) none
xanadu-46      1      xeon      mixed@   40   2:10:2 257914        0      1   (null) none
xanadu-47      1      xeon        idle   40   2:10:2 257914        0      1   (null) none
xanadu-50      1      xeon      mixed@   40   2:10:2 257914        0      1   (null) none
amd partition: will have 24 nodes with each having 48/64 cores and 156/256 GB of memory
$ sinfo -N -l -p amd

NODELIST   NODES PARTITION       STATE CPUS    S:C:T MEMORY TMP_DISK WEIGHT AVAIL_FE REASON
xanadu-11      1       amd      mixed@   48    8:6:1 257949        0      1   (null) none
xanadu-12      1       amd        idle   48    8:6:1 257949        0      1   (null) none
xanadu-13      1       amd       mixed   48    8:6:1 257949        0      1   (null) none
xanadu-14      1       amd      reboot   48    8:6:1 257949        0      1   (null) none
xanadu-15      1       amd       mixed   48    8:6:1 257949        0      1   (null) none
xanadu-16      1       amd      mixed@   48    8:6:1 257949        0      1   (null) none
xanadu-17      1       amd      mixed@   48    8:6:1 128925        0      1   (null) none
xanadu-18      1       amd       mixed   48    8:6:1 128925        0      1   (null) none
xanadu-19      1       amd      mixed@   48    8:6:1 257949        0      1   (null) none
xanadu-20      1       amd      mixed@   48    8:6:1 257949        0      1   (null) none
xanadu-21      1       amd       mixed   48    8:6:1 128925        0      1   (null) none
xanadu-22      1       amd       mixed   48    8:6:1 128925        0      1   (null) none
xanadu-23      1       amd        idle   64    8:8:1 257933        0      1   (null) none
xanadu-24      1       amd       mixed   64    8:8:1 257933        0      1   (null) none
xanadu-25      1       amd        idle   48    8:6:1 257949        0      1   (null) none
xanadu-26      1       amd        idle   48    8:6:1 128925        0      1   (null) none
xanadu-27      1       amd        idle   48    8:6:1 128925        0      1   (null) none
xanadu-28      1       amd        idle   48    8:6:1 128925        0      1   (null) none
xanadu-29      1       amd        idle   48    8:6:1 128922        0      1   (null) none
xanadu-30      1       amd        idle   48    8:6:1 128922        0      1   (null) none
xanadu-31      1       amd        idle   48    8:6:1 128922        0      1   (null) none
xanadu-33      1       amd   allocated   64    8:8:1 257933        0      1   (null) none
xanadu-34      1       amd       mixed   64    8:8:1 257933        0      1   (null) none
xanadu-35      1       amd   allocated   64    8:8:1 257933        0      1   (null) none
xanadu-36      1       amd        idle   64    8:8:1 257933        0      1   (null) none
xanadu-45      1       amd        idle   24    4:6:1 258020        0      1   (null) none
gpu partition: consists of 1 node which has 36 cpus and 256 GB of memory
$ sinfo -N -l -p gpu

NODELIST   NODES PARTITION       STATE CPUS    S:C:T MEMORY TMP_DISK WEIGHT AVAIL_FE REASON
xanadu-06      1       gpu       mixed   36   2:18:1 257845        0      1   (null) none
To access the gpu partition the users need to use the following information for th partition and qos:
--partition=gpu --qos=general
mcbstudent partition: consists of 2 nodes each having 256GB of RAM and 36 and 40 cpus. This node is restricted to courses and workshops held by UConn. Course instructors can request to reserve the nodes for their course in advance by requesting it through the online form available in our website [link to the form].
$ sinfo -N -l -p mcbstudent
NODELIST   NODES  PARTITION       STATE CPUS    S:C:T MEMORY TMP_DISK WEIGHT AVAIL_FE REASON
xanadu-09      1 mcbstudent       mixed   36   2:18:1 257845        0      1   (null) none
xanadu-47      1 mcbstudent       mixed   40   2:10:2 257914        0      1   (null) none
Students and course instructors who have access to this partition, can use these nodes using the following information for the partition and for qos:
--partition=mcbstudent --qos=mcbstudent
pacbio partition: consists of 4 nodes having upto 36/48 cups and 128/256GB of RAM memory. These nodes are restricted to be used by Pacbio SMRT Analysis software. How to access the Pacbio SMRT Analysis portal can be found in our pacbio tutorial.
sinfo -N -l -p pacbio
NODELIST   NODES  PARTITION       STATE CPUS    S:C:T MEMORY TMP_DISK WEIGHT AVAIL_FE REASON
xanadu-09      1    pacbio       mixed   36   2:18:1 257845        0      1   (null) none
xanadu-17      1    pacbio       mixed   48    8:6:1 128925        0      1   (null) none
xanadu-18      1    pacbio       mixed   48    8:6:1 128925        0      1   (null) none
xanadu-48      1    pacbio       mixed   36   2:18:1 128693        0      1   (null) none
Summary of the nodes associated in the Xanadu cluster:

Working with Slurm
Resource limitations to keep in mind:

e.g: If user uses an aggregate of 400 cores and/or 1TB RAM across all nodes, all other pending user jobs will be held until they drop below the limit
Default memory allocated per cpu : 128MB
*if more memory is needed, please specify in the script using –mem option explained below.
Time Limitations:

(If you need an extension click here. Extension requests must be sent at least 2 days prior to the job end date, excluding weekends. We will attempt to accommodate short notice extension requests, but you should endeavor to get a confirmation from support staff via Slack or email.)
Storage limitations
- Home directories: Each user is given 1TB by default and this can be increased to 2TB on request.
- Lab Directories: For projects, that require access to the same data files by multiple users, a lab directory can be requested by the PI. The default lab directory size is set to 2TB but can be upgraded to 10TB on request. Use cbcsupport@uconn.edu for your requests.


To check how much space you have used, can use the disk usage command :
du -sh <path to the directory>
You can check the current lab space usage using this link
- Long-term storage: The cluster has designated space
/archivefor long-term storage. We strongly encourage users to archive their files that are no longer used in the analysis. This archive location has a reasonably fast access speed that will allow quick retrieval of the files when needed. The archive directory for users or labs is not set/created by default, hence it has to be requested either by the user or PI (for lab archive space). There is no size or time limit set for the archived data. PI and users can send their archive directory requests to cbcsupport@uconn.edu.
For a lab group the long time storage space need to be requested by the PI to cbcsupport@uconn.edu via email.
Using the cluster to run jobs can be done in two ways
When you connect with the cluster using ssh, (to external-submit-node or internal-submit-node) you will be connected with the submit-nodes, which are virtual environments which have been placed to submit jobs using submission scripts. These submit nodes only have 4GB of memory and overpowering these nodes with running commands such as copying files, removing files, executing jobs will hinder the others from getting access to the cluster. If your purpose is to write a script, copy files, delete files or to execute short jobs which does not last that long, then you should get into an interactive session and the submit-node is not the one for you. If you have have already wrote your script and want to submit it, then submit-node is the one for you.
1. Running a job interactively:
The first point of contact for a user on the cluster is the head-node/submit-node. Any command that is given at the prompt is executed by the head-node/submit-node. This is not desirable as head-node/submit-node has a range of tasks to perform and its use for computational purpose will slow down its performance. However, often it is convenient/desired to run some commands on command line rather than running them through a script. This can be achieved by initiating an “Interactive session” by executing commands on compute-nodes.
How to Start a Interactive Session
Interactive sessions are allowed through internal and external submit nodes. There are no big differences between the internal and external submit nodes except that the external submit node can be reached without using the VPN (explained below). It is also not possible to ssh from the external submit node to other internal servers.
Once logged in start an interactive session using srun command
To start a bash interactive session:
$ srun --partition=general --qos=general --pty bash
To reattach to a running interactive session:
$ sattach <jobid.stepid>
To start a bash interactive session with memory allocation:
$ srun --partition=general --qos=general --mem=200M --pty bash
It is also important to know the free memory available before starting your interactive session using sinfo -o "%n %e":
sinfo -o "%n %e"
HOSTNAMES FREE_MEM
xanadu-24 18642
shangrila01 21817
shangrila04 70193
shangrila06 55369
shangrila08 25836
...
...
xanadu-33 326092
xanadu-29 326694
Free memory is indicated in MB.
Once you logged into the interactive session, to check the memory in the interactive session can use the sstat <jobid>.batch command. The jobid number has to be appended by suffix .batch:
sstat 471448.batch
2. Using a submission script
Sample script for standard job submission.
#!/bin/bash
#SBATCH --job-name=myscript
#SBATCH -N 1
#SBATCH -n 1
#SBATCH -c 1
#SBATCH --partition=general
#SBATCH --qos=general
#SBATCH --mail-type=END
#SBATCH --mem=5G
#SBATCH --mail-user=first.last@uconn.edu
#SBATCH -o myscript_%j.out
#SBATCH -e myscript_%j.err

echo `hostname`
echo "Hello World"
module load fastqc/0.11.5
fastqc /home/CAM/$USER/raw_data/file.fastq
A general script will consist of 3 main parts:
- The #!/bin/bash line which allows to run as a bash script
- Parameters for the SLURM scheduler indicated by #SBATCH
- Command submission line(s) which comes from your selected application
The #SBATCH lines indicate the set of parameters for the SLURM scheduler.
#SBATCH --job-name=myscript Is the name of your script
#SBATCH -n 1 --ntasks Number of Task to run. The default is one task per node.
#SBATCH -N 1 --nodes This line requests that the task (-n) and cores requested (-c) are all on same node. Only change this to >1 if you know your code uses a message passing protocol like MPI. SLURM makes no assumptions on this parameter -- if you request more than one core (-n > 1) and your forget this parameter, your job may be scheduled across nodes; and unless your job is MPI (multinode) aware, your job will run slowly, as it is oversubscribed on the master node and wasting resources on the other(s).
#SBATCH -c 1 --cpus-per-task number of cpus requested per task.
#SBATCH --partition=general This line specifies the SLURM partition (in this instance it will be the general partition) under which the script will be run
#SBATCH --mail-type=END Mailing options to indicate the state of the job. In this instance it will send a notification at the end
#SBATCH --mem=5G 5Gb of memory requested (required)
#SBATCH --mail-user=first.last@uconn.edu Email which the notification should be sent to
#SBATCH -o myscript_%j.out Specifies the file to which the standard output will be appended, %j will add JOBID number to file name.
#SBATCH -e myscript_%j.err Specifies the file to which standard error will be appended, %j will add JOBID number to file name.
echo `hostname` Gets the name of the node the job is running. We strongly recommend to put this line in every script that you are running. So it will help the HPC team to determine and troubleshoot any problems when an error is encountered.
module load fastqc/0.11.5 Load the softwarefastqcof version0.11.5. Usemodule loadto load required software package with appropriate version.
fastqc /home/CAM/$USER/raw_data/file.fastq Runsfatstqconfile.fastqfile located at /home/CAM/$USER/raw_data/
- Always specify the absolute path to the input files. This will avoid errors and job failures in case the script is moved around.
How to specify the partition and qos in a submission script:
To submit a job to a particular partition –partition and –qos must be specified in the script.
To use the general partition:
--partition=general
--qos=general
To use the himem partition:
--partition=himem
--qos=himem
If you are interested in using a GPU node please set the partition and qos as below:
--partition=gpu
--qos=general
Please note that there is only one GPU node on Xanadu cluster (xanadu-06). Xanandu-06 is also part of general partition so sometimes it may take a while to get on it if it is heavily used.
How to submit a job
To submit a script to the cluster can be done using the sbatch command
All scripts are submitted to the cluster with the following command:
$ sbatch myscript.sh
In some special cases when you want to submit a job with out login to the cluster can be done using:
ssh @xanadu-submit-ext.cam.uchc.edu sbatch myscript.sh
Before submitting the above job you may need to include the following line to your ~/.bashrc file
. /etc/profile.d/modules.sh
Then need to add the following line at the end of your ~/.bash_profile file:
source ~/.bashrc
Monitoring a submitted job
To monitor all the jobs squeue can be used
$ squeue
             JOBID PARTITION     NAME     USER ST       TIME  NODES NODELIST(REASON)
            246233   general  STO_001    USER1 CG       4:48      1 xanadu-21
            301089     himem ProtMasW    USER2 PD       0:00      1 (Priority)
            301013       amd ProtMasN    USER2  R    5:43:21      1 xanadu-24
            301677   general mv_db.sh    USER3  R      14:48      1 xanadu-22
            297400     himem  bfo_111    USER4  R 1-07:16:26      4 xanadu-[30-33]
It will give information on the jobs on all partitions. One important aspect is the state of the job in the queue.
Where;
R – Running
PD – Pending
CG – Cancelled
To monitor a particular job squeue command can be used. In this example, the jobID is 201185. This number is provided at the time of job submission and can be used to reference the job while it is running and after it has completed.
$ squeue -j 201185

             JOBID PARTITION     NAME     USER ST       TIME  NODES NODELIST(REASON)
            201185   general myscript    [USER_ID] R       0:29      1 xanadu-20
To monitor jobs submitted by a user
$ squeue -u UserID

            JOBID PARTITION     NAME     USER ST       TIME  NODES NODELIST(REASON)
            200642   general Trinity   UserID  R    3:51:29      1 xanadu-22
            200637   general Trinity   UserID  R    3:54:26      1 xanadu-21
            200633   general Trinity   UserID  R    3:55:51      1 xanadu-20
To monitor jobs in a particular partition:
$ squeue -p general

             JOBID PARTITION     NAME     USER ST       TIME  NODES NODELIST(REASON)
            287283   general  bfo_111    User1  R   15:54:58      2 xanadu-[24-25]
            203251   general   blastp    User2  R 3-02:22:39      1 xanadu-23
            203252   general   blastp    User3  R 3-02:22:39      1 xanadu-23
Display information on a running/completed job sacct can be used
$ sacct

       JobID    JobName  Partition    Account  AllocCPUS      State ExitCode
------------ ---------- ---------- ---------- ---------- ---------- --------
288052             gmap    general pi-wegrzyn          1  COMPLETED      0:0
288052.batch      batch            pi-wegrzyn          1  COMPLETED      0:0
288775             gmap    general pi-wegrzyn          1    RUNNING      0:0
$ sacct --format=jobid,jobname,account,partition,ntasks,alloccpus,elapsed,state,exitcode -j 288775

       JobID    JobName    Account  Partition   NTasks  AllocCPUS    Elapsed      State ExitCode
------------ ---------- ---------- ---------- -------- ---------- ---------- ---------- --------
288775             gmap pi-wegrzyn    general                   1   00:02:55    RUNNING      0:0
How to check the time limit allocated for a specific job (Start, Elapsed, Timelimit);
$ sacct --format=Start,Elapsed,Timelimit -j 592709
              Start    Elapsed  Timelimit
------------------- ---------- ----------
2018-10-09T11:45:32 15-22:04:19 21-00:00:+
To get more information about a specific job scontrol can be used
$ scontrol show jobid 900001

JobId=900001 JobName=blast
   UserId=USER1(#####) GroupId=domain users(#####) MCS_label=N/A
   Priority=5361 Nice=0 Account=pi QOS=general
   JobState=RUNNING Reason=None Dependency=(null)
   Requeue=1 Restarts=0 BatchFlag=1 Reboot=0 ExitCode=0:0
   RunTime=01:39:25 TimeLimit=UNLIMITED TimeMin=N/A
   SubmitTime=2017-06-27T16:51:36 EligibleTime=2017-06-27T16:51:36
   StartTime=2017-06-27T16:51:36 EndTime=Unknown Deadline=N/A
   PreemptTime=None SuspendTime=None SecsPreSuspend=0
   Partition=general AllocNode:Sid=hpc-submit-int:27120
   ReqNodeList=(null) ExcNodeList=(null)
   NodeList=xanadu-24
   BatchHost=xanadu-24
   NumNodes=1 NumCPUs=1 NumTasks=1 CPUs/Task=1 ReqB:S:C:T=0:0:*:*
   TRES=cpu=1,node=1
   Socks/Node=* NtasksPerN:B:S:C=0:0:*:1 CoreSpec=*
   MinCPUsNode=1 MinMemoryNode=0 MinTmpDiskNode=0
   Features=(null) Gres=(null) Reservation=(null)
   OverSubscribe=OK Contiguous=0 Licenses=(null) Network=(null)
   Command=blast.sh
   WorkDir=Plant
   StdErr=blast.err
   StdIn=/dev/null
   StdOut=blast.out
   Power=
If you want more information on the job, you can add the -dd option to the command as:
$ scontrol show -dd jobid 900001
How to cancel a job after submission:
If you need to stop a job which you have submitted, you can use the command scancel with the JobID number:
$ scancel <jobID>
To terminate all your jobs:
$ scancel -u <UserID>
How to load software:
loading software can be done using the module command. To check the available softwares in the cluster use module avail command, which will give the available modules/software packages in the cluster. Following is a small portion of the software files which will show up when you execute the command.
$ module avail

---------- /isg/shared/modulefiles ----------
bowtie2/2.0.0                   hisat2/2.1.0                    Platanus/1.2.4                  tophat/1.3.3
bowtie2/2.0.6                   hmmer/3.1b2                     poretools/0.6.0                 tophat/1.4.0
bowtie2/2.1.0                   HOGAN/2016-05-10                pplacer/1.1a19                  tophat/1.4.1
bowtie2/2.2.6                   htseq/0.9.1                     PrAS/beta                       tophat/2.0.7
bowtie2/2.2.9                   htslib/1.7                      prodigal/2.6.3                  tophat/2.0.8
bowtie2/2.3.1                   hyphy/2.3.11                    prokka/1.11                     tophat/2.0.9
bowtie2/2.3.3.1
boost/1.53.0                    gperftools/2.5                  phrap/1.090518                  stringtie/1.3.3b
boost/1.58.0                    graphmap/0.5.1                  phred/0.071220.c                structure/2.3.4
boost/1.61.0                    gridss/1.5.1                    picard/1.122                    subread/1.6.0
boost/1.65.1                    Gromacs/2016.1                  picard/2.0.1                    swig/3.0.10
bowtie/0.11.3                   Gromacs/5.1.2                   picard/2.2.1                    taco/0.7.3
bowtie/0.12.7                   gsl/2.1                         picard/2.9.2                    tbl2asn/24.9
Then to load a module/software to your working environment or to your script use module load command followed by the module name:
e.g.: if you want to load the picard/2.9.2 module, then use:
module load picard/2.9.2
To check the modules which have been loaded to your environment, use module list command:
$ module list picard/2.9.2
Currently Loaded Modulefiles:
  1) java-sdk/1.8.0_92   2) picard/2.9.2
To check the associated variables and the path of the module file use module display command:
$ module display picard/2.9.2
-------------------------------------------------------------------
/isg/shared/modulefiles/picard/2.9.2:

module-whatis	 adds picard-2.9.2 to your environment variables
prepend-path	 PATH /isg/shared/apps/picard/picard-tools-2.9.2
setenv		 PICARD /isg/shared/apps/picard/picard-tools-2.9.2/picard.jar
module		 load java-sdk/1.8.0_92
system		 echo `hostname` `whoami` `date +"%F %T"` picard/2.9.2 >> /isg/shared/logs/modules/usage.log
-------------------------------------------------------------------
The Picard module will load the environmental variable called PICARD, where the program can be called upon instead of giving the full path to the executable file.
Where you can call the program by:
java -jar $PICARD <rest of the arguments>
To unload a module use: module unload command:
module unload picard/2.9.2
which will remove the Picard from your environment.
File System Information:
/home/CAM/username OR /home/FCAM/username:: This is your home directory. This is the default location when you login to the system. You can run any analysis from this directory and you have ~2TB of space available here.
/labs/pi-name :** This is a collaborative resource created on request to share data with other members of your lab. Please contact the CBC to request a folder for your lab.
/projects/project name :** This is a collaborative resource created on request to share data with other project members. Please contact the CBC to request a folder for your lab.
/linuxshare/users/username:** This directory exists to archive data longterm (compressed and tarred). This space is available upon request. It is equivalent to /archive on BBC in that in should not be used as a location for running analysis.
/linuxshare/projects/project name:**# This directory exists to archive data longterm for specific projects (compressed and tarred). This space is available upon request. It is equivalent to /archive on BBC in that in should not be used as a location for running analysis.
/UCHC/GlobusXfer : This directory is the destination on Xanadu for endpoint “UConn Health HPC” for transferring data/files using Globus. Once transferred please move the files to your desired location and delete it from GlobusXfer directory.
/local/tmp: This directory can be used for temporary storage of your data while the calculations are running. Once the calculations are done, the data needs to be moved out from this space. It has around 600GB space.
/scratch: NFS mounted filesystem, This directory can be used for temporary storage of your data while the calculations are running. Once the calculations are done, the data needs to be moved out from this space. It has around 84T space.
/isg/shared/databases : Includes aligner index (gmap, HiSAT2, Bowtie2 etc of commonly used species/genomes), blast, diamond, kraken, pfam, swiss-prot, BUSCO etc.
NOTE:
# /linuxshare directories are archival as reads and writes will be slower than other repositories
** Please place a request for these directories via the contact-us form by selecting the “Bioinformatics and Technical support” option. Once created users by the Xanadu administrators, users can populate them as they wish.
Transferring Data Between Clusters:
The Data transfer process for large files can have two distinct steps,
(1) STEP 1: Formatting data which include compressing Data, md5sum strings etc
(2) STEP 2: Transfering the data
STEP 1
In order to transfer the data directory between clusters, it is a good practice to compress the directory and generate md5sum string for the compressed file before transferring. This string should match with md5sum value generated after transferring the file. This is to ensure complete and uncorrupted transfer of data. Steps are listed here,
If you are running these command on xanadu, please avoid running them on submit node. Please start an interactive session as
$ srun --pty bash
This will move you to one of the compute nodes. To check that you are on compute node simply execute
$ hostname
The output should be one of the compute nodes starting with shangrila or xanadu, if the output is hpc-submit-ext or hpc-submit-int then the interactive session is not initiated. Try again and if the problem persists please get in touch at cbcsupport@uconn.edu
(1) Compress the directory
data : Directory with data to be compressed
to compress execute the command.
$ tar -cvzf data.tar.gz data
data.tar.gz : Output compressed file.
(2) Create md5sum string
$ md5sum data.tar.gz
STEP 2
(3) Once the files are compressed, please use transfer.cam.uchc.edu VM to initiate a transfer. To log in on transfer VM and try
ssh <user_name>@transfer.cam.uchc.edu
use your CAM account credentials. Please do not use Xanadu submit nodes for transferring files.
Transfer file
$ scp [source] [destination]
case1: When logged on BBC (or any other cluster) and transferring file to Xanadu
$ scp path/to/data.tar.gz user_name@transfer.cam.uchc.edu:<Path to Home Dir>
case2: When logged on Xanadu and transferring file from BBC
$ scp user_name@bbcsrv3.biotech.uconn.edu:<path/to/data.tar.gz> <Path to Home Dir>
In both cases it will prompt your for password, this password is for the cluster in which you are not currently logged on.
After transfer check the md5sum of the transferred file at the destination.
$ md5sum data.tar.gz
The value or string should match the string generated in step 2.
Decompress the file
$ tar -xvzf data.tar.gz
Once the transfer process is completed to exit from the interactive session simply execute
$ exit
More detailed information on file transfer methods can be found in our tutorial on Data Transfer .